The difference between primary skills and technique.
Before we dive in, it is important to make a clear distinction between primary skills and personal technique.
Primary skills are the core principles your technique is built on. These skills are like universal rules, which apply the same to everyone regardless of age, body type, or ability.
Mechanics, Technique, Form — whichever term you prefer — all refer to how you, as an individual, perform these primary skills. This is not a set of strict rules that apply to everyone identically, because our bodies are all different.
We focus on these skills first because they are, quite simply, the bedrock that your technique is built upon. The more solid this foundation, the higher level game you can build on it.
Anticipating some of your comments, it should be mentioned that it doesn’t mean that if your game is not based on the exact methods below, then you cannot play at a high level. You most certainly can and there are some players, even world champions, whose game is built according to different set of principles. This here is simply, in my opinion, the most optimal and consistent method, especially for those who are not able to play full time but want to compete at the highest level.
The EMR principle
Before we proceed, let’s establish a guiding philosophy.
We grow in two ways. First by learning skills that what we do not know, and then by perfecting those skills through practice. In the game of pool we learn new shots , but more importantly for this topic, we refine and fine tune our game to be able to perform what we have learned in the most consistent and effective manner available to us.
The principle of EMR (Effective Minimum Required) is to build your game and technique on the most effective movements with the least amount of complexity required. This is the key to minimizing variance and increasing consistency.
If this resonates with you, then everything that follows should make sense.
The 3 Primary Skills
In all cue sports, the technical aspect of the game can be reduced down to just three core skills:
1) Identify the correct shot line.
2) Place the cue precisely on the shot line.
3) Deliver the cue straight.
Master these simple sounding skills, and you’ll never miss a ball — theoretically. Let’s look a little closer.
Primary Skill 1 – Identify the correct shot line.
What exactly is the shot line?
The shot line is the imaginary straight line that your cue follows as you stroke the ball.
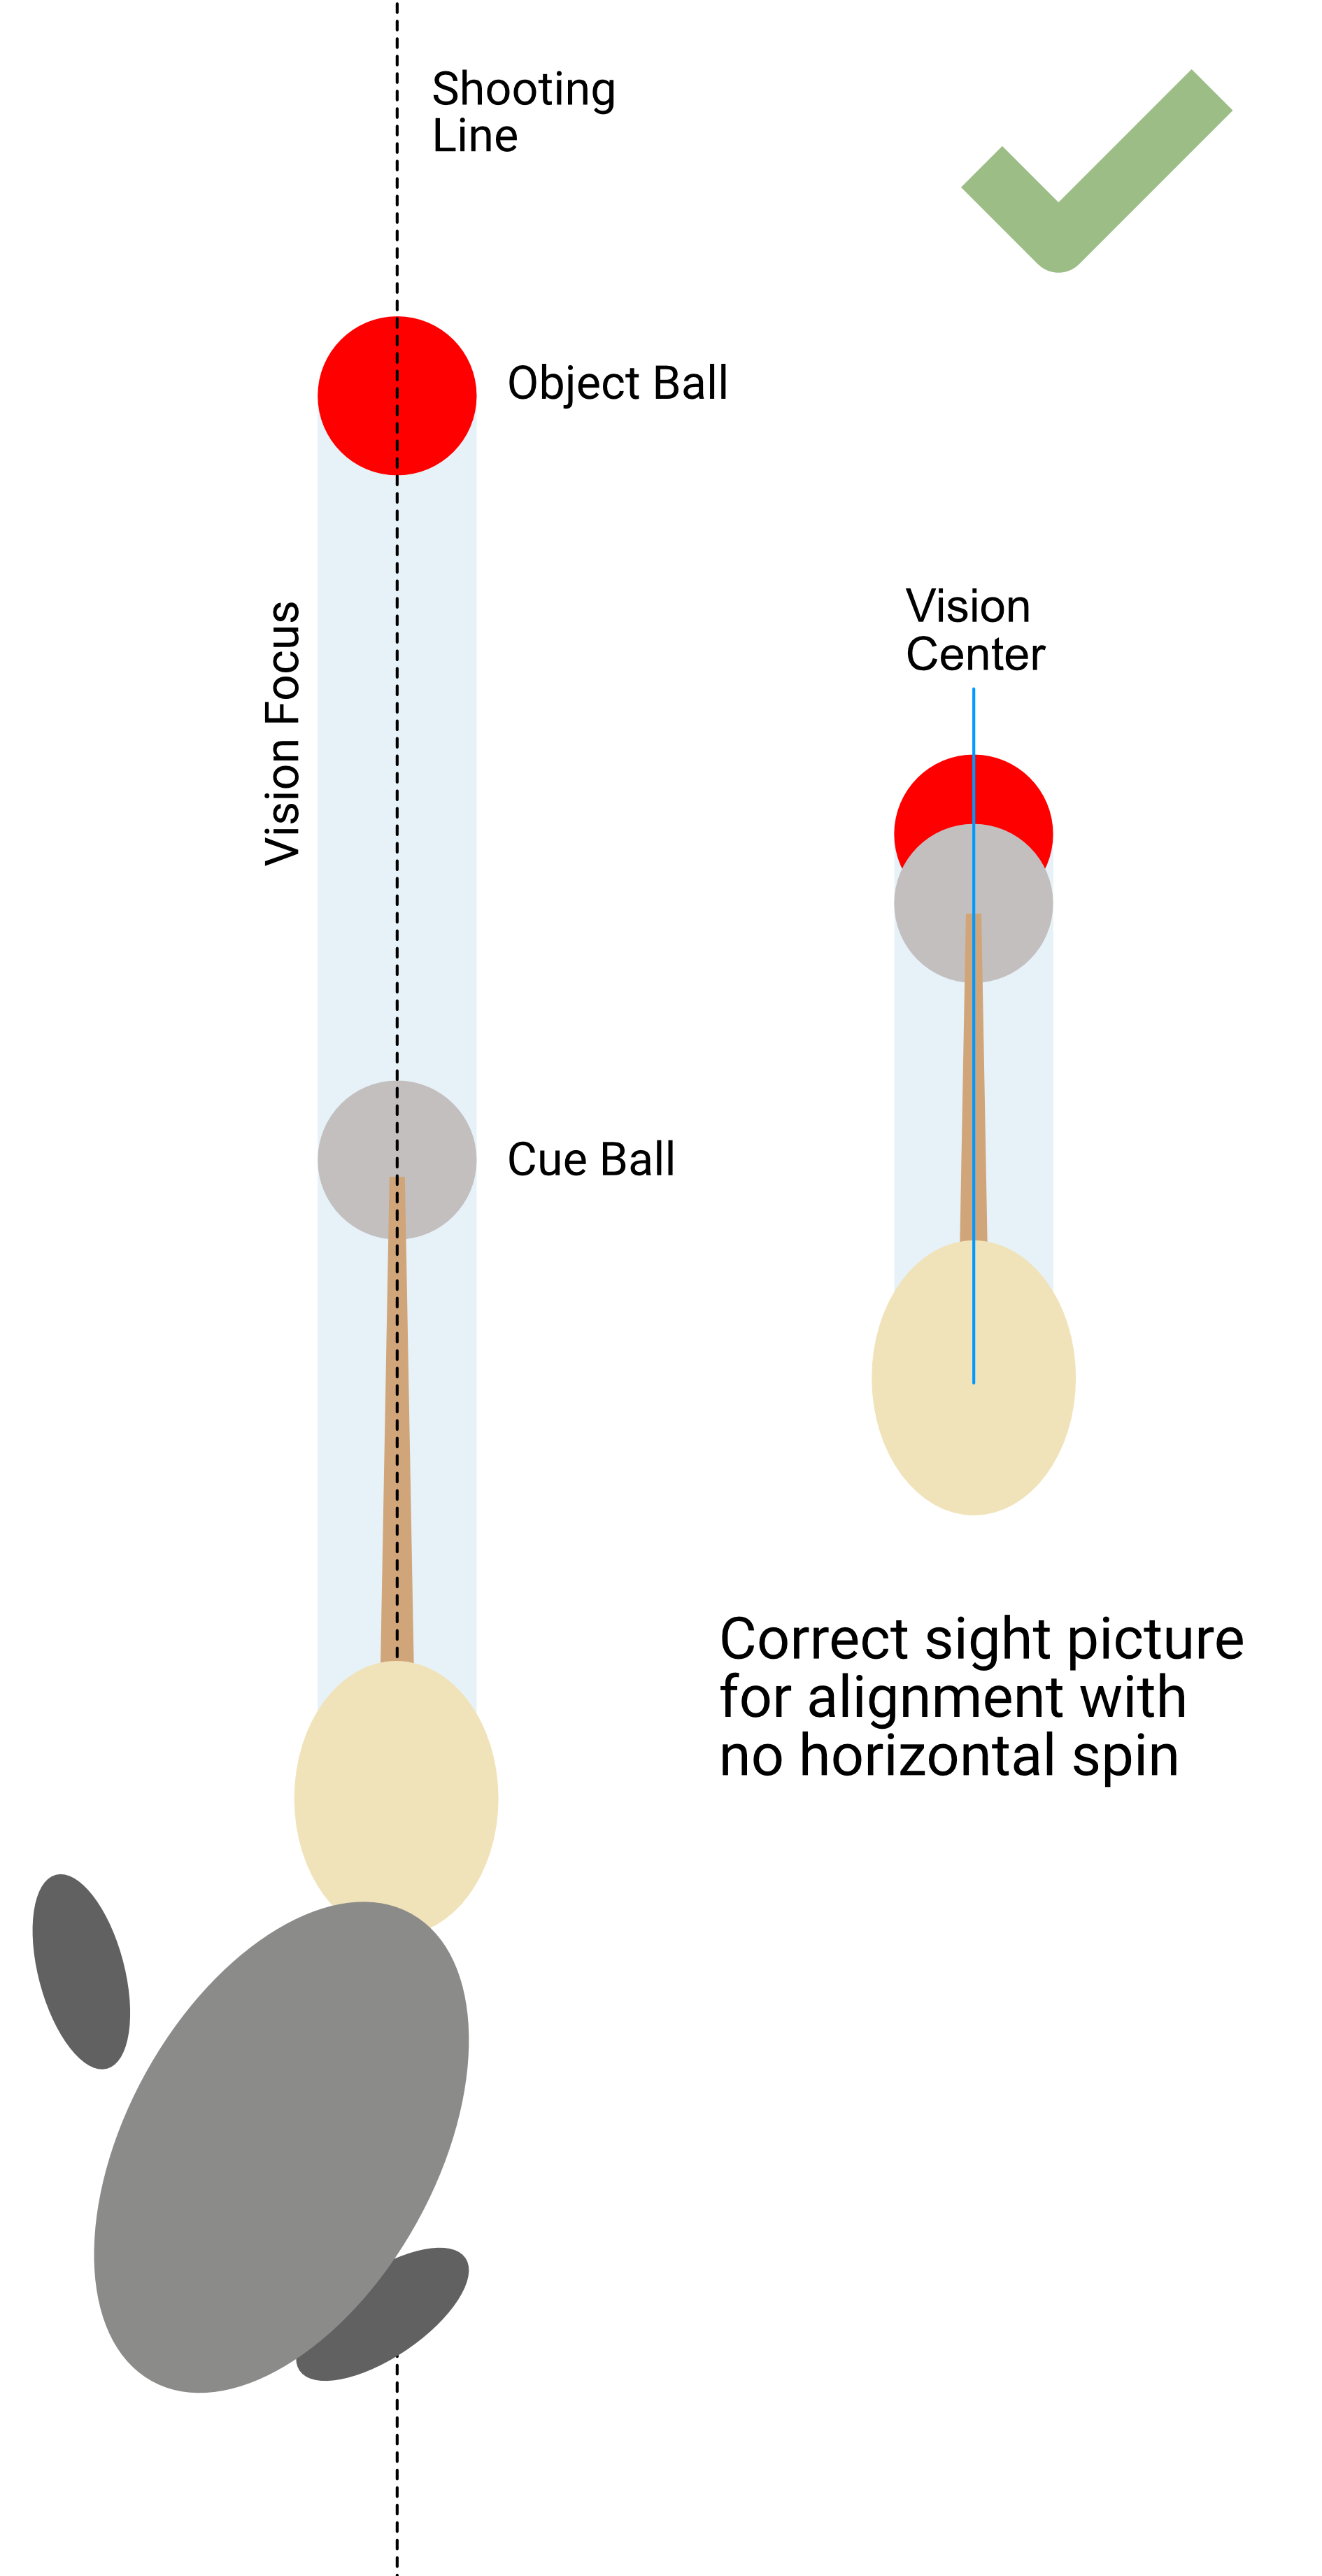
With vertical spin (draw and follow), the cue ball trajectory will be exactly the same as the shooting line.
However, even the slightest amount of side spin (left or right) will introduce deflection and swerve (Here is a link to Dr. Dave’s video to explain) and result in the cue ball moving on a path that is different from the shooting line.
The difference this makes sounds obvious and somewhat unimportant, but this small detail is what caused a major compounding error that held my game back for a long time. I believe this error is systemic and affects the vast majority of players.
The issue with aiming systems.
In pool instruction, aiming systems are a frequently used tool to help players visualize angles. The most common ones are the ghost ball and the fractional aiming system. These systems, learned in the beginning stages of a player’s journey, can cause a fundamental issue with aiming and alignment further down the line.
I will use the ghost ball system as an example, but the same principle applies to most of the aiming systems that teach you to aim by visually focusing on the cue ball – object ball contact.
The ghost ball error.
As we begin learning the game, seeing correct angles is difficult and even thinking about sidespin can be overwhelming. The ghost ball system feels like a cheat code for identifying the exact spot where the cue ball has to hit the object ball. After some time it becomes easier and it is no longer necessary to visualize the ghost ball every time, as we begin to instinctively sense the correct angle and recognize how the cue ball and object ball should visually overlap. We will call this overlap an alignment picture.
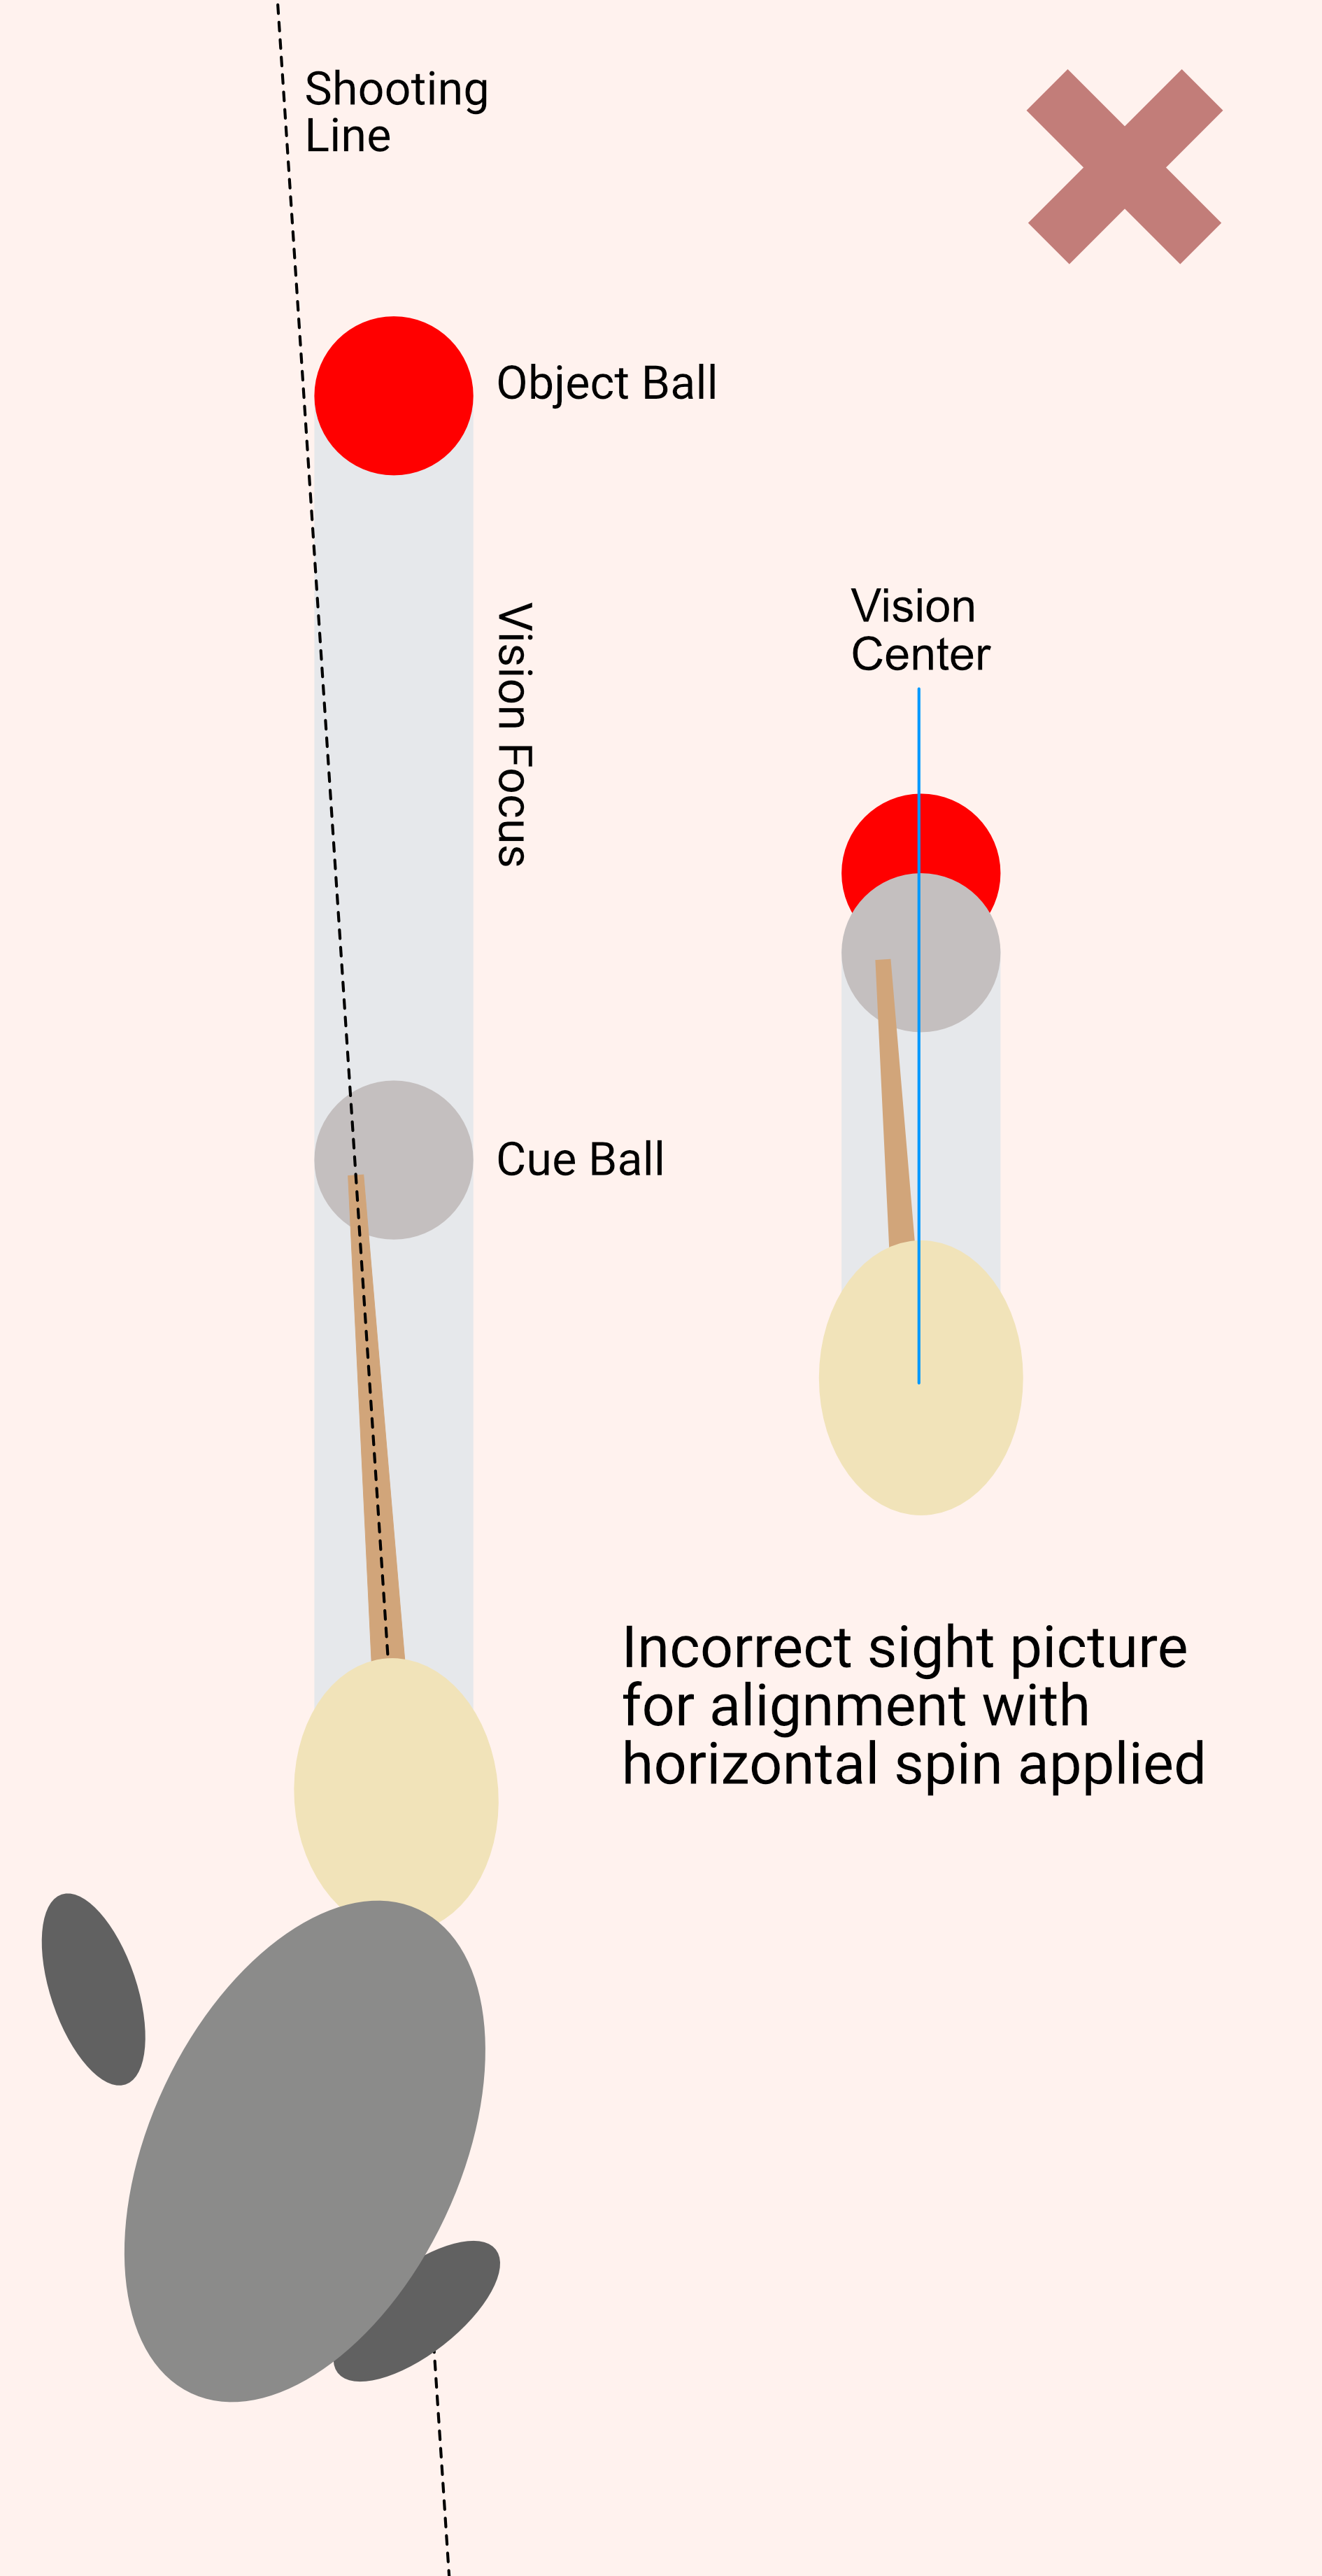
As we develop further and start to use sidespin for better cue ball control, most players still tend to aim their shots same way. This means that it is very common to see a player aim a shot played with sidespin and a shot played with center ball using the same alignment picture.
But we already know that when we add sidespin to a shot, the shot line is no longer the same as the cue ball path.
Therefore, if the player does not account for this small but important difference in their alignment, the exact same shot – when played with different types of sidespin – will each time result in a slightly different cue angle, while their eyes (as well as head & body) remain in relatively the same position.
And as a result the player has to learn to deliver the cue straight and true at many slightly different trajectories in relation to their stance. Needless to say, this is difficult to do with consistency and does not agree with the EMR principle.
Another issue that this constant variance between body position and cue trajectory causes is that the cue is often initially placed on the shot line inaccurately. The player then has to correct the angle of the cue while already down on the shot – either by pivoting the cue until the shot ‘feels’ right, or – in the more common but ultimately worse case scenario – by arcing (swooping) the cue from the incorrect aiming position to the correct shot line at the moment of impact. Over time, players learn to make these minor corrections instinctively, entirely by ‘feel’. It becomes part of their game and muscle memory. While some people can get very good at this, it is tough to do reliably, specially when the stakes are high and the pressure is on.
Is there a better way?
The EMR approach to aiming.
Remember the EMR principle? Less variance and moving parts will always result in higher consistency.
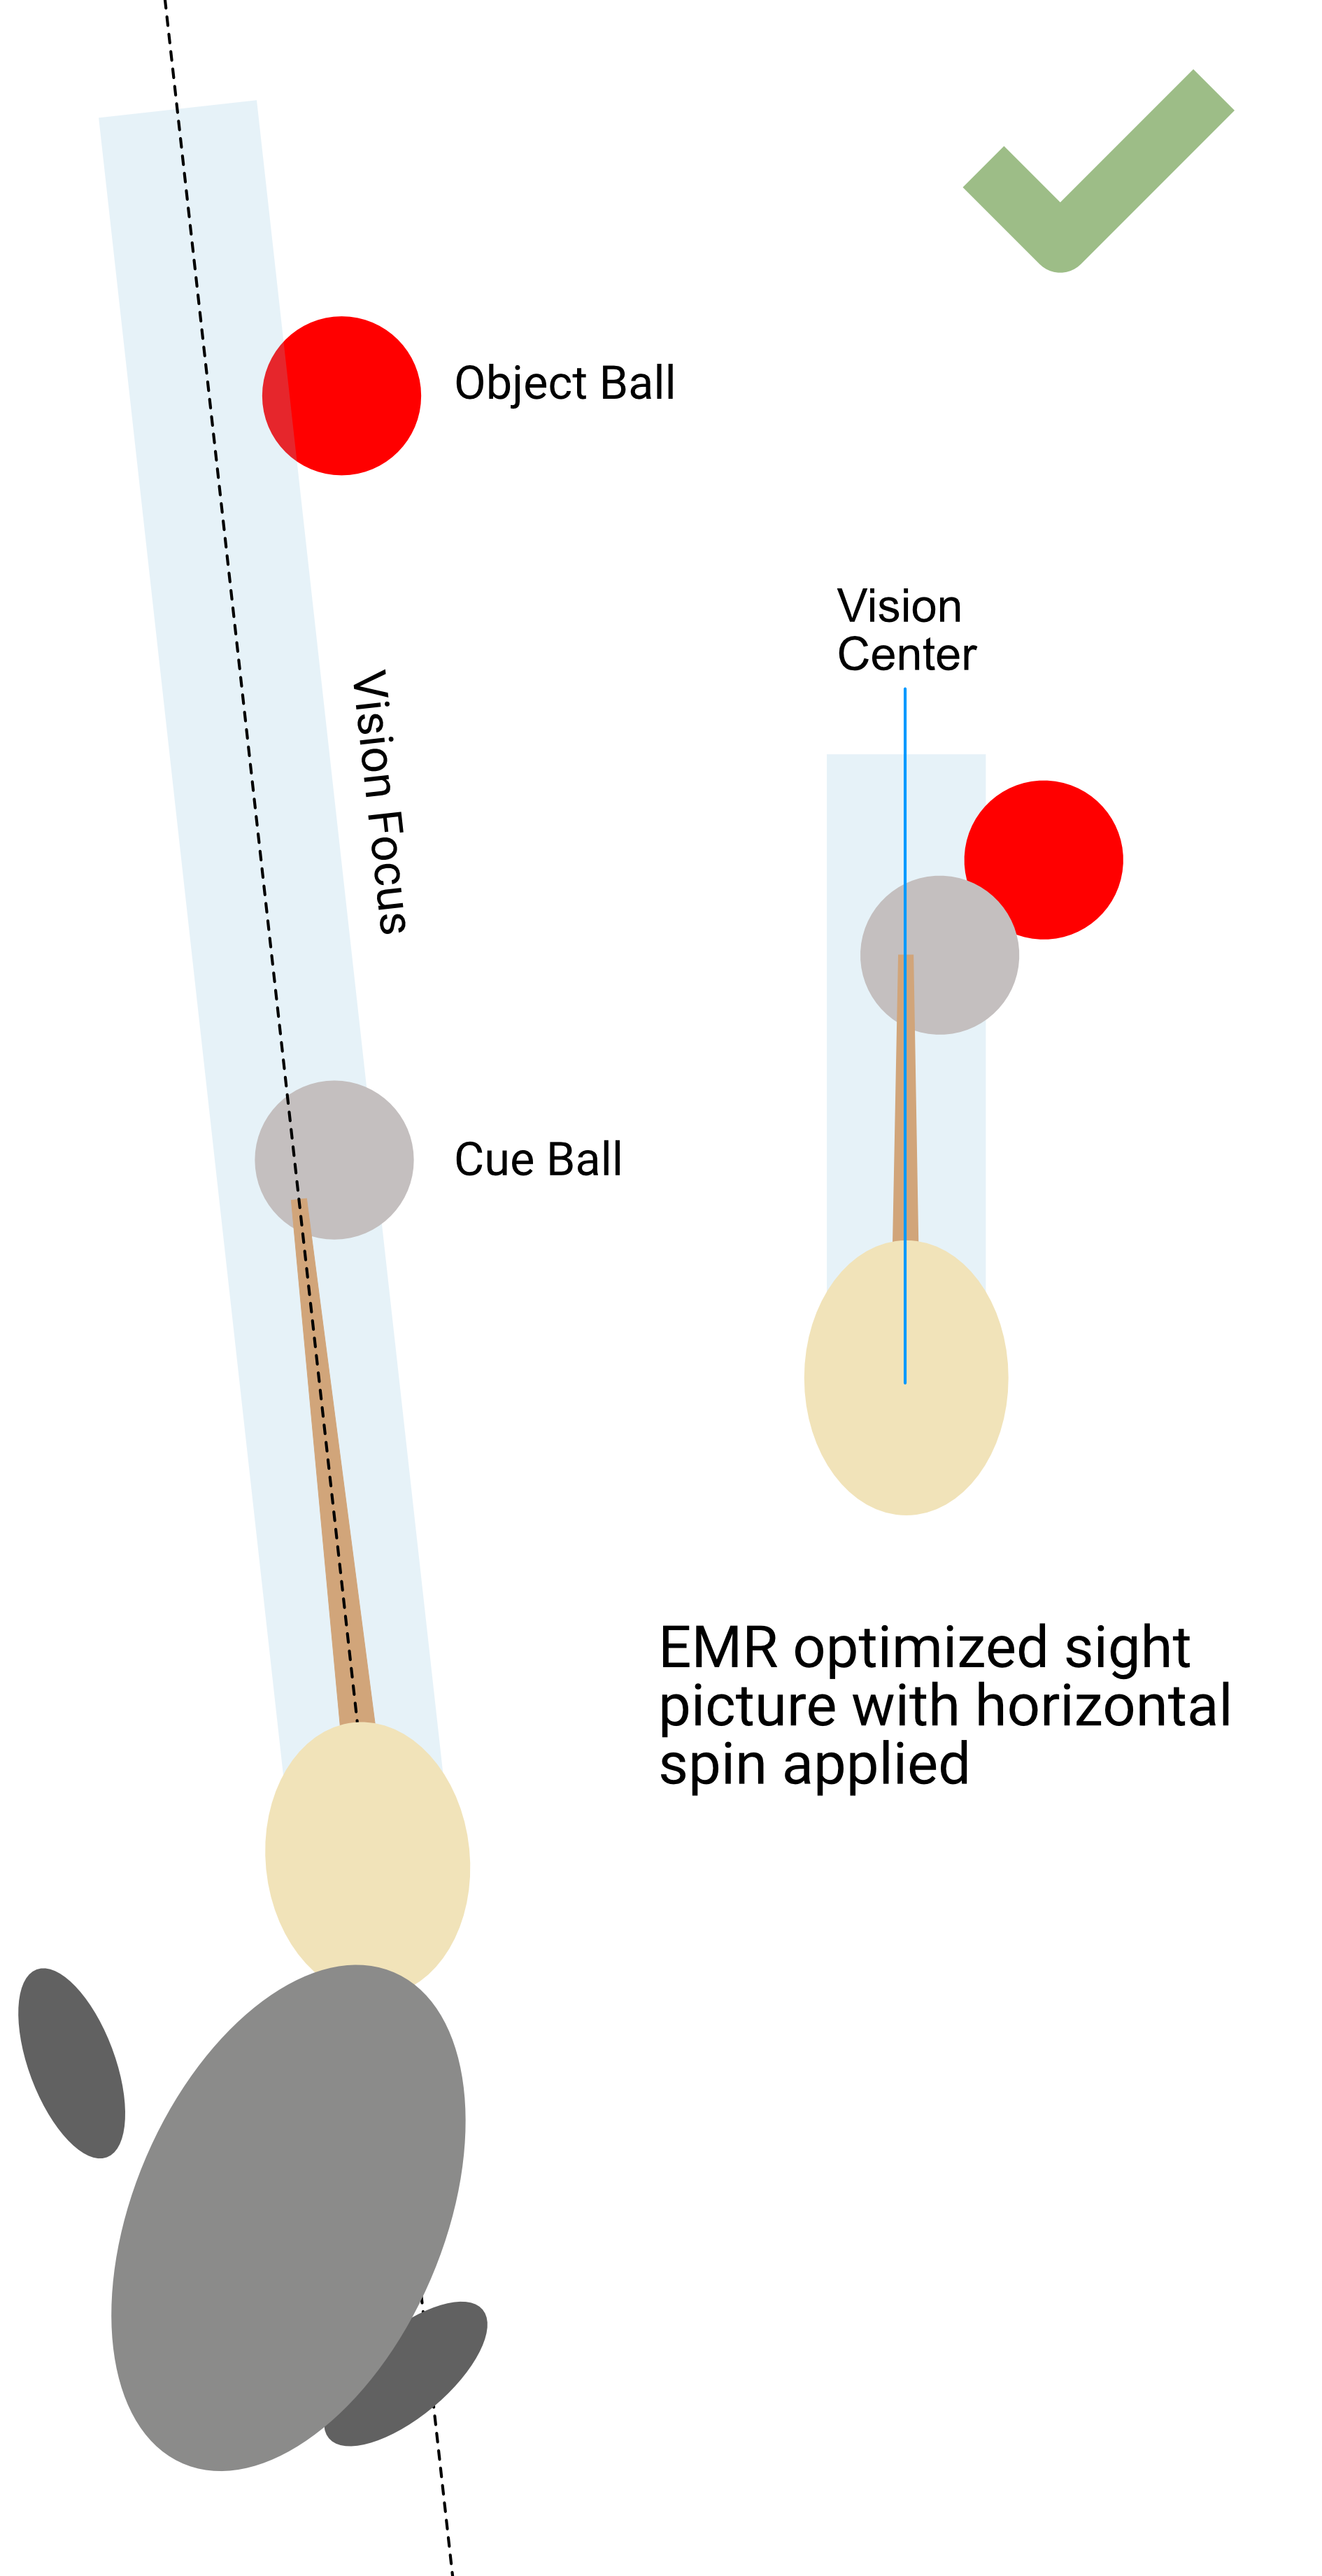
The goal here is to approach the shot in the way, where your body is performing just one single, simple movement, with no adjustments necessary.
It starts with alignment, i.e. your starting position.
As you are getting ready for the next shot, instead of keeping your focus on the contact point or the ghost ball, go one step further and take the time to carefully estimate the shot line – taking into account to the speed and spin you intend to use. Stand square to the shot line and acknowledge how the shot alignment picture is now different to what you are used to. It will soon become second nature.
With some practice, as you begin to align your stance more accurately, even tough shots with extreme side spin will start to feel comfortable.
You will find yourself performing a simple straight stroke with your cue arm that feels exactly the same every time, no matter the type of shot and no matter the type of spin.


The Key Takeaway
The key takeaway here is that by adding one additional step to your pre-shot routine, you have significantly simplified your mechanics and, as a result, increased your consistency. From a mechanical point of view, it no longer matters what kind of angle you have or what kind of spin you intend to use, the shooting motion is and feels exactly the same and you can fully focus on delivering a straight stroke with no need for last moment, ‘feel’-based corrections. Every shot has become simply about repeating the exact same straight cue-arm movement.
Congratulations, you have acquired the first primary skill.
Primary Skill 2 – Place the cue precisely on the shot line.
Primary Skill 3 – Deliver the cue straight.
Introduction
Both of these skills are fairly self explanatory (put the stick accurately on the line and keep it there) and vastly about personal technique. Not much can be written in terms of general guidance, because everyone is different and no one does things exactly the same way due to physical differences.
There are of course some general guidelines to follow, that apply to most people – like having your vision center, your shoulder, elbow, and wrist all on the same vertical plane makes it easier to deliver a straight stroke. However, some people just cannot physically do that, especially older players who might find it more difficult to be flexible. As another example, if you are right handed but your vision center happens to be all the way left, it’s nearly impossible to get everything perfectly onto the same plane, no matter how flexible you are. I have come across beginning players trying to brute force this because they have been told that that’s the only ‘correct’ way. As a result, they would often misalign their vision center and cause a number of different problems down the line.
It was important to take the time to thoroughly discuss skill 1. Skills 2 & 3 are better explained through examples.
The Self Assessment Method.
We are at a unique point in time, when almost everyone has access to tools to improve our game. None of this was available to players even just 10 years ago. Mobile phones with slow motion cameras can capture and show us all the little unseen details and public forums like Reddit can help us instantly share and ask all the questions we need to effectively coach ourselves as a community.
The method that I developed and will explain here is self-diagnostic and iterative. Observe yourself closely and you will be able to pinpoint exactly the mistakes are happening, make adjustments, observe again and repeat.
Equipment needed.
The only 2 things that you need is a smartphone that takes video and a small tripod that has more height than a pool table – I recommend the Ulanzi MT-44 on Amazon. The tripod is about 20 bucks and fits into my (large) cue case.
Set your phone to display a grid (ideally 4×4) over your video. It is an option in the advanced settings in the camera app. It helps if the grid has a vertical line in the center of the screen. An iphone only has a 3×3 grid which will have vertical lines to the sides but not the center. This will do, but is not ideal.
Setup.
We will be reviewing 2 different types of strokes, straight shots with vertical spin and cut shots with horizontal spin.
Set up a straight shot on the table and place the camera behind the pocket in a way that the central vertical grid line goes through the dead center of both balls. Get this super perfect, if it is off by even a single degree, it will make your mistakes much more difficult to spot.
Zoom in a fair amount. You don’t need to have the pocket in the frame, because it does not matter if the ball goes in or not. You want to be zoomed into the area where your body will be. Make sure you include enough height to have you fully in frame while still standing behind the shot.
It is important to mark the spots of the balls on the table very accurately with doughnuts or chalk so that you can set the shot up in the exact same spot over and over again without having to move the camera every time.
For cut shots (a spot shot for instance), place another ball in the ghost ball location next to the object ball. Now line up your camera so that the central grid line goes through the center of the ghost ball and the center of the cue ball.
Now shoot!
The goal is to shoot the shots as you normally do. Don’t try to be extra careful or do your routine differently, because then you won’t spot the mistakes you need to fix. It is about analysis, so keep your shots and tempo as natural as you can.
Shoot the straight in shot with different vertical spin (draw, center, follow) and at different speeds. Shoot each shot a couple of times.
Shoot the angled shot with different horizontal spin (right side spin, center ball, left side spin). Use a minimum of 2 tips of side spin, too little and any mistakes might be too subtle to detect. Again, shoot each shot a couple of times.
And the fun bit – review.
You can either do this straight in your phone, but it’s even better to do it on a larger screen, with the option to view the video at slower speed, and also to view it frame by frame. On a PC, I use a program called POT player (link). It is the only video player that I have found that will go back and forward by a single frame at the press of a button. Or, on a phone or a tablet, I like to use an app called Frameskip which lets you go back and forward frame by frame, or altarnatively Coach View (link), which lets you draw a straight line on top of the video to check alignment.
Now, everyone’s video and mistakes will be different, so I cannot write much here about what to do or adjust, but I will post a video below from my own practice session and add commentary in terms of what I am looking at and what mistakes I am noticing.
The 3 fundamental skills can be easily assessed all at the same time with this method. 1 & 2 are fairly straightforward assess and iterate by yourself. Focus on those first. If you are doing 1 & 2 correctly and consistently, but have difficulty with keeping your cue straight through delivery, I would recommend getting help from an experienced instructor to work on your technique.
